Git and GitHub for the e^win!
Git and Github are the ultimate tools of the developers.

Currently working as an AI prompt engineer, I possess skills in blockchain engineering, data analysis, generative AI research, and :) you guessed it- prompt engineering. I am passionate about blockchain data analysis and business applications of prompt engineering.
Control Systems is a must-needed skill in the repertoire of any software developer. Today, we will explore Git, an open-source version control system. GitHub is a for-profit company providing Git with access control, bug tracking, software feature requests, task management, and several other features. It is used extensively by individual developers and companies to manage their projects and release new open-source projects.
This article will cover all the basic and advanced concepts of Git and Github. We will initially explore the origins of Git and GitHub and then begin our journey with a simple commit.
Getting Started:
The infrastructure we will be using for the article:
OS: Windows XI.
Git and GitHub
Let's begin with our journey.
Open terminal: Win->cmd
For convenience, navigate to the Desktop directory.
Create a demo folder for practicing and creating the git directory and run git commands.
You can create a new directory in the command prompt by following the command below:
mkdir dir_name
Here I have named the directory git_demo:

Initialize a new git repository on the current directory.
To do that: use the following command->git init.

Now, you can create a text file using type nul > test1.txt which will create a text file called test1.txt inside the git_demo folder.
Iterate the same process and create three text files.


Add, and commit files to Git repositories:
.git files are stored as hidden files in your folder.
To view the hidden files, use the command-> dir /a:h

As mentioned above, we have included this folder in git_demo:
Now, we should add all the test files to the git repository and explore the "add" and commit commands"
Let's first look inside our directory-> dir /B

Let's look at "git status" and execute -> git add . command.

I will explain the above commands using an example of a queue of students submitting their assignments to a faculty member. To all the readers wondering why the email was not used, I am pondering the same thing. But let's just go 50 years into the past, using my time machine- I let my friends use it. Now, when a student comes to submit the assignment- let's just put that as the 'add' command.
'git add .'

In the same way, the 'commit' command- it can be compared with the assignment being verified by the faculty member.
git commit -m "message_name".
Intermediate Git Concepts:
Now, we delve a little bit deeper to interact intuitively with the version control system.
Let's understand the git log command:
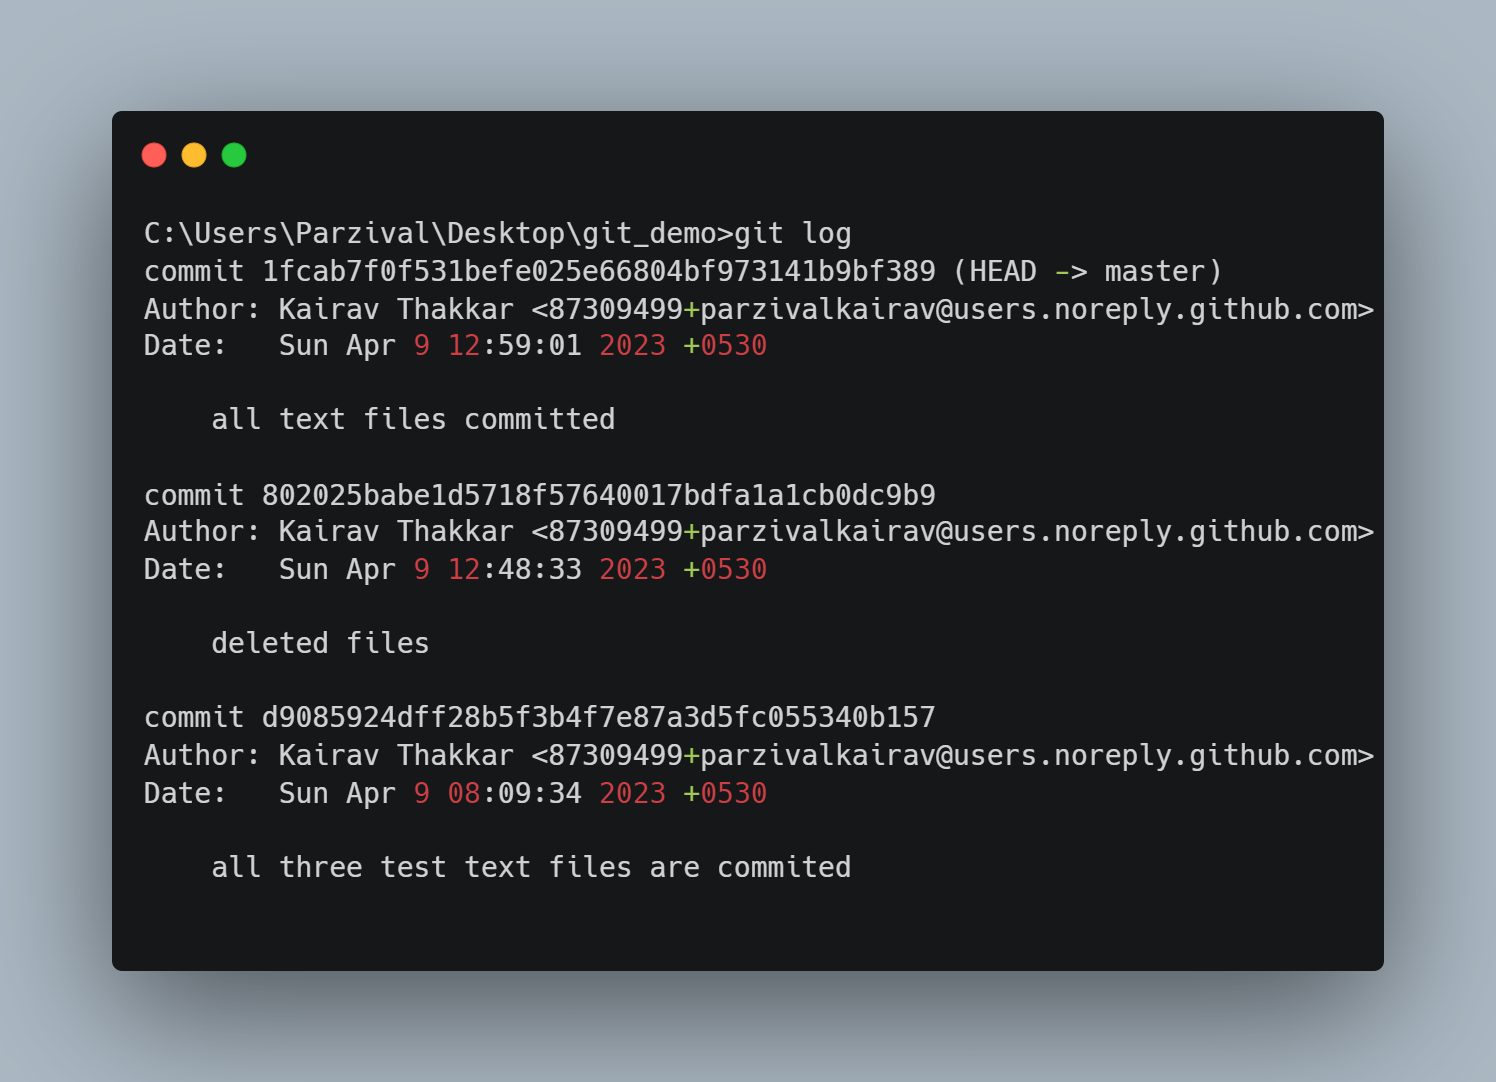
As we can see there are different instances of commits made to the Git repository. It is important to understand the different fields covered, such as:
1-> Author
2-> Date, day, and time.
These fields come in handy when there is more than one contributor to any Git repository.
We can revert back to a commit or delete any fault commit made by any user.
A command to attain a version of the git repository of a specific commit is called reset:

An important tool to visualize the changes in the structure of the commits is:
https://learngitbranching.js.org/
We will take certain illustrations and examples from the websites to better understand the git process.
Now, let's explore the revert command
It is used to revert back to a specific commit and change the state of the system as per that commit.
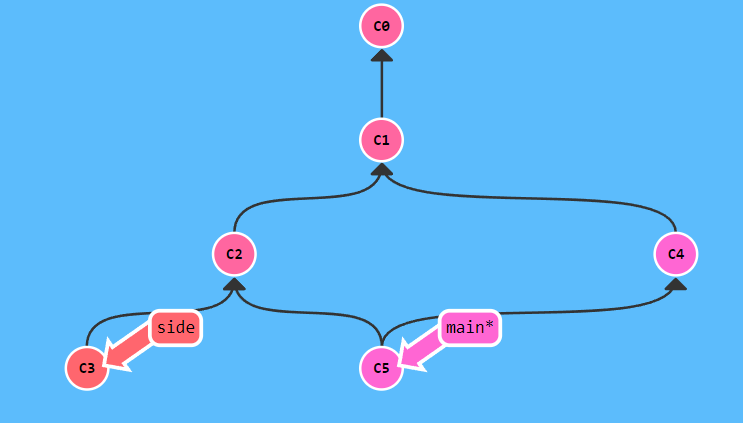
As observed, reset and revert pretty much do the same thing: except they don't.
For now, it is necessary to observe that reset is used for local branch while revert is used for the remote branch.
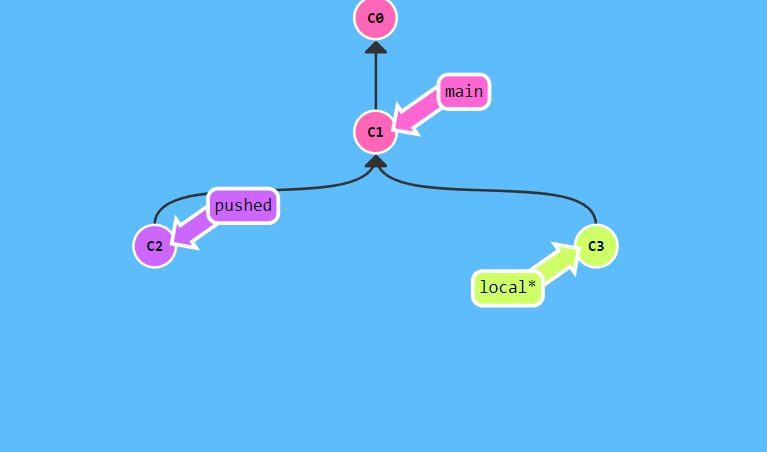
git reset C1;
git checkout pushed;
git revert C2

In the images above, the branch with the name 'local' is a local branch and thus reset command will be used in the context of that branch. In the same way, the branch 'pushed' will be a remote branch and thus the revert command is used.
Please note that C1,C2,C3 are just to demonstrate the commits.
Restore and Stash:
Now, let's explore the restore command:
The git restore command in Git is used to restore files in your working directory to a previous state. It allows you to undo changes made to files and restore them to a specific commit or file state.
To restore a file using git restore, you need to specify the file name as an argument to the command. For example, git restore file.txt would restore the file.txt file to its state in the most recent commit.

Moving on to the stash command:
The git stash command in Git is used to temporarily save changes in your working directory that are not ready to be committed yet. It allows you to set aside your current changes and switch to a different branch or commit, without committing the changes to your Git history.
To create a stash using git stash, simply run the command without any arguments. Git will save your changes and revert your working directory to the last commit. You can then switch to a different branch or commit and continue working.
One of the key features of Git is the ability to create a "stash" of changes, which allows developers to save their work temporarily and switch to another branch without committing the changes.

This command comes in handy when you're in the middle of working on something and you need to switch to another branch or do some other task. By using the stash command, you can save your changes and switch to another task without committing them.
Branch, Checkout, and Cherry-pick:
The git branch command in Git is used to manage branches in your repository. It allows you to create, delete, list, and rename branches, and is an essential tool for working with Git branches.
To create a new branch using git branch, you simply specify the name of the new branch as an argument to the command. For example, git branch feature-branch would create a new branch called feature-branch.
git branch branch1
The git checkout command in Git is used to switch between different branches or to move the current branch to a different commit or file state. It's a powerful command that allows you to move around in your Git repository and work with different versions of your code.
To switch to a different branch using git checkout, you simply specify the name of the branch you want to switch to as an argument to the command. For example, git checkout main would switch to the main branch.
git checkout C_name
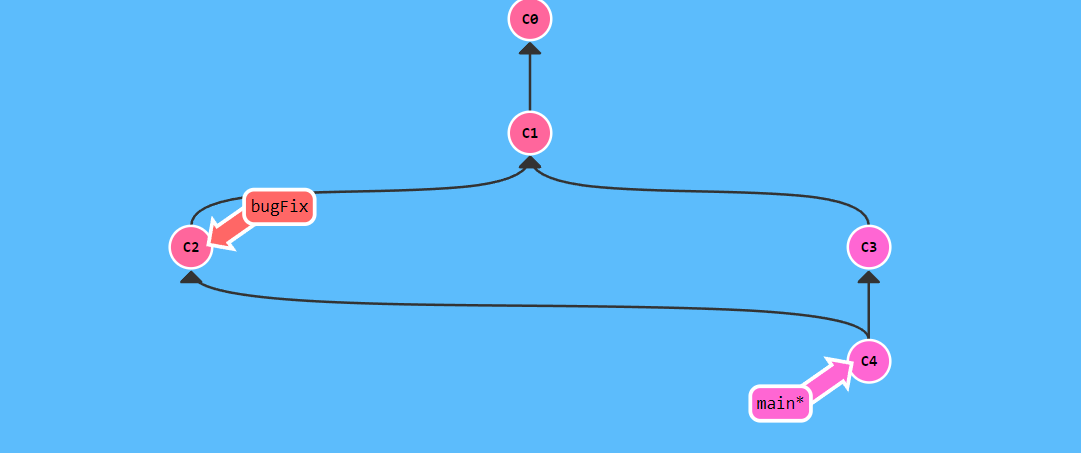
A single command to accomplish branch creation and the checkout command is as follows:

git checkout -b bugFix

The git cherry-pick command in Git is used to apply a specific commit from one branch onto another branch. This is useful when you want to selectively apply a change from one branch to another, without merging the entire branch.
To use git cherry-pick, you first need to identify the commit that you want to apply. You can find the commit hash using git log or a Git GUI tool.

git cherry-pick C3 C4 C7

Merge, Rebase, and Clone:
Let's explore the merge command in the git version control system:
The git merge command is used in Git to combine changes from one branch into another branch. This is typically done to incorporate changes from a feature branch into the main development branch, but it can also be used for other purposes such as merging changes from different forks or integrating changes from upstream sources.
When you use git merge, Git will take the changes from the source branch and apply them to the target branch, creating a new commit that combines the changes. This commit will have two or more parent commits, representing the history of both branches.
It results in a new commit while merging the files from both commits.

git checkout -b bugFix
git commit
git checkout main
git commit
git merge bugFix
Let's learn about the rebase command.
The git rebase command in Git is used to apply a series of commits from one branch onto another branch. This allows for a cleaner, linear history of changes and can be especially useful when working with feature branches that are constantly being updated.
When you use git rebase, Git will take all the changes from your current branch that are not in the target branch and reapply them on top of the target branch. This essentially creates a new branch with a linear history that includes all the changes from both branches.

git checkout -b bugFix
git commit
git checkout main
git commit
git checkout bugFix
git rebase main

The interactive rebase command in Git allows you to modify the history of a branch by selectively editing, reordering, or deleting commits. This can be useful for cleaning up your Git history or preparing a branch for merging.
When you run an interactive rebase, Git will open an editor with a list of the commits that are being rebased. For each commit, you can choose to keep it as-is, edit it, squash it, or delete it. You can also reorder the commits by rearranging them in the list.

git rebase -i C1
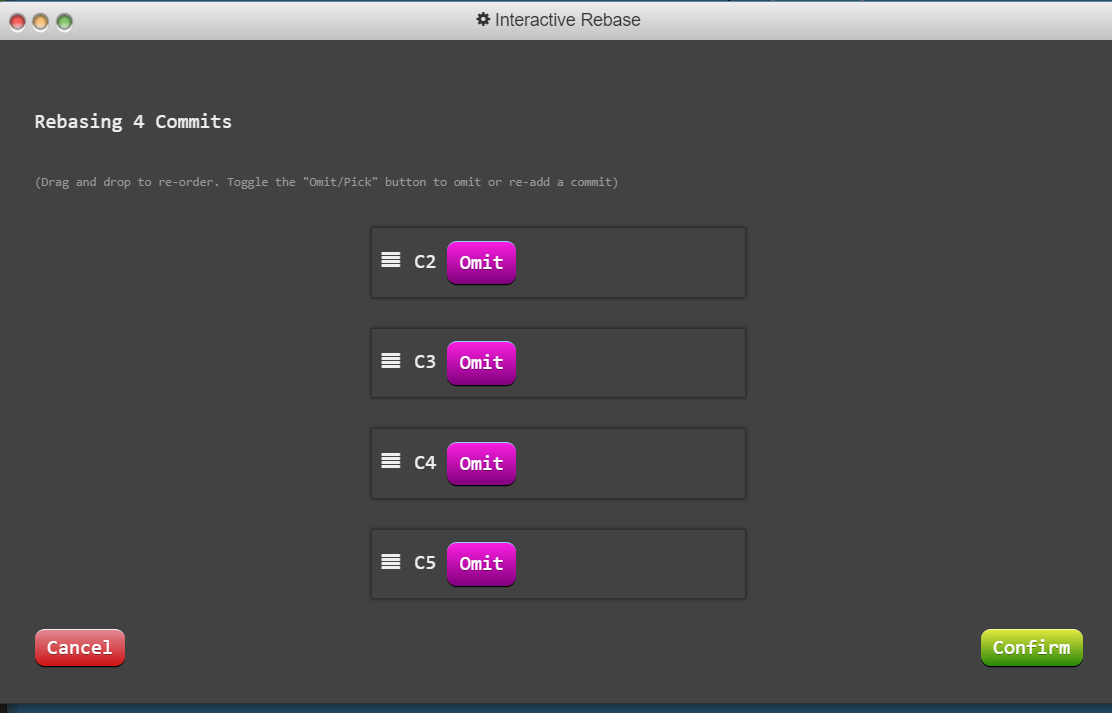

It's important to note that interactive rebasing can potentially rewrite the history of your branch, so it should be used with caution. It's also a good practice to only use interactive rebasing on branches that you are the sole owner of, as it can cause conflicts if multiple people are working on the same branch.
Tags and Describe:
In Git, a tag is a reference to a specific commit in your Git history. It's a way to mark a specific point in time in your project, such as a release or a major milestone. Tags are immutable and never change, making them a useful way to track important points in your project's history.
To create a new tag in Git, you can use the git tag command followed by the tag name and the commit hash you want to tag. For example, git tag v1.0.0 abc123 would create a new tag named v1.0.0 at the commit with the hash abc123.
To list all the tags in your Git repository, you can use the git tag command without any arguments. This will display a list of all the tags in your repository, in alphabetical order.
git tag v0 C1
git checkout C2
git tag V1

The git describe command can be useful for quickly getting an idea of where your code is in relation to your tags, and can help you keep track of which version of your code is currently in production.


Remote and Github:
GitHub is a web-based platform that provides Git hosting services and tools for collaboration and project management. It allows users to store their Git repositories in the cloud and provides a variety of features that make it easier to work with Git and collaborate with others.
One of the key features of GitHub is its social coding platform, which allows users to contribute to open-source projects, discover new projects, and connect with other developers around the world. GitHub also provides tools for project management, such as issue tracking, project boards, and wikis, which can help teams collaborate more effectively and stay organized.
In addition to hosting Git repositories, GitHub also provides a range of other services and features, including code review tools, automated testing and deployment, and integrations with other tools and services.
In Git, a remote is a repository that is hosted on a different server or location than your local repository. Remotes are used to facilitate collaboration and sharing of code between developers, and allow you to push your changes to a shared repository and pull changes from that repository into your own local repository.
When you clone a repository from a remote server, Git automatically creates a reference to that remote in your local repository. You can view the list of remotes in your repository using the git remote command, which will display a list of the remote names associated with your repository.
Connecting your local repository with the remote repository:
Connecting your local Git repository with a remote Git repository is an essential step in collaborating with other developers and sharing your code.
If we follow the steps below, we can easily accomplish the task:
Step 1: Create a Remote Git Repository Before you can connect your local Git repository to a remote repository, you need to have a remote repository to connect to. You can create a remote repository on services like GitHub, GitLab, or Bitbucket. Once you have created your remote repository, note down its URL or SSH key.
Step 2: Initialize Git in your Local Repository If you haven't already done so, you need to initialize Git in your local repository. Navigate to the root directory of your project and run the command git init in the terminal. This will create a new local Git repository in your project directory.
cd dir_name
git init
Step 3: Add a Remote Now you need to add a remote reference to your local repository. Use the git remote add command followed by a name for the remote and the URL or SSH key for the remote repository. For example, to add a remote named "origin" for a repository hosted on GitHub, you would use the following command:
git remote add origin https://github.com/yourusername/your-repo.git
You can check if the remote is successfully added by running git remote -v, which will display a list of all the remote references associated with your local repository.
Step 4: Push to the Remote Repository Once you have added the remote reference to your local repository, you can push your local changes to the remote repository using the git push command. For example, to push your local master branch to the origin remote, you would use the following command:
git push -u origin master
This will push your local changes to the remote repository and set up tracking so that you can easily push and pull changes between your local and remote repositories in the future.
Step 5: Pull from the Remote Repository If other developers have made changes to the remote repository, you can pull those changes into your local repository using the git pull command. For example, to pull changes from the origin remote into your local master branch, you would use the following command:
git pull origin master
This will pull the latest changes from the remote repository and merge them with your local repository.
Connecting your local git repository with the remote git repository will allow you to collaborate with developers across the world.
Push, Pull, Fetch:
In Git, the push, pull, and fetch commands are used to interact with remote repositories and synchronize changes between your local repository and the remote repository. Here's a brief explanation of each command:
git push: The git push command is used to upload your local changes to a remote repository. This command takes the local changes you have committed in your repository and sends them to the remote repository. You can specify which branch to push, and you may also need to provide authentication credentials if you are pushing to a private repository.
For example, if you have made changes to the master branch in your local repository and you want to push those changes to the origin remote, you can run the following command:
git push origin master
git pull: The git pull command is used to download and incorporate changes from a remote repository into your local repository. This command pulls changes from the specified branch in the remote repository and merges them with the current branch in your local repository. If there are conflicts between the local and remote changes, Git will prompt you to resolve them.
For example, if you want to pull changes from the origin remote and merge them with the master branch in your local repository, you can run the following command:
git pull origin master
git fetch: The git fetch command is used to download changes from a remote repository without merging them into your local repository. This command updates your local copy of the remote repository's branches, allowing you to see the changes that have been made without making any changes to your own code. You can then use the git merge command to merge these changes into your local branch.
For example, if you want to fetch changes from the origin remote, you can run the following command:
git fetch origin
These commands are essential for collaboration and synchronization in Git and are used regularly by developers to keep their local and remote repositories in sync. By understanding how to use these commands, we can work more effectively and efficiently with Git.


